

How to Use Volumizing Hair Clips for Salon-Quality Volume
Delena MarklandVolumizing hair clips are soft fabric rollers on spring clips that grip at the root and set lift into hair in minutes - no heat, no teasing, no damage. I'm Delena, a licensed cosmetologist and owner of The Pixie Garden, and I've been using these clips in the salon for years to give clients that freshly styled bounce without adding stress to their hair. The technique is straightforward, but the placement and timing make all the difference between hair that falls flat by noon and volume that holds all day.
How Volumizing Hair Clips Actually Work
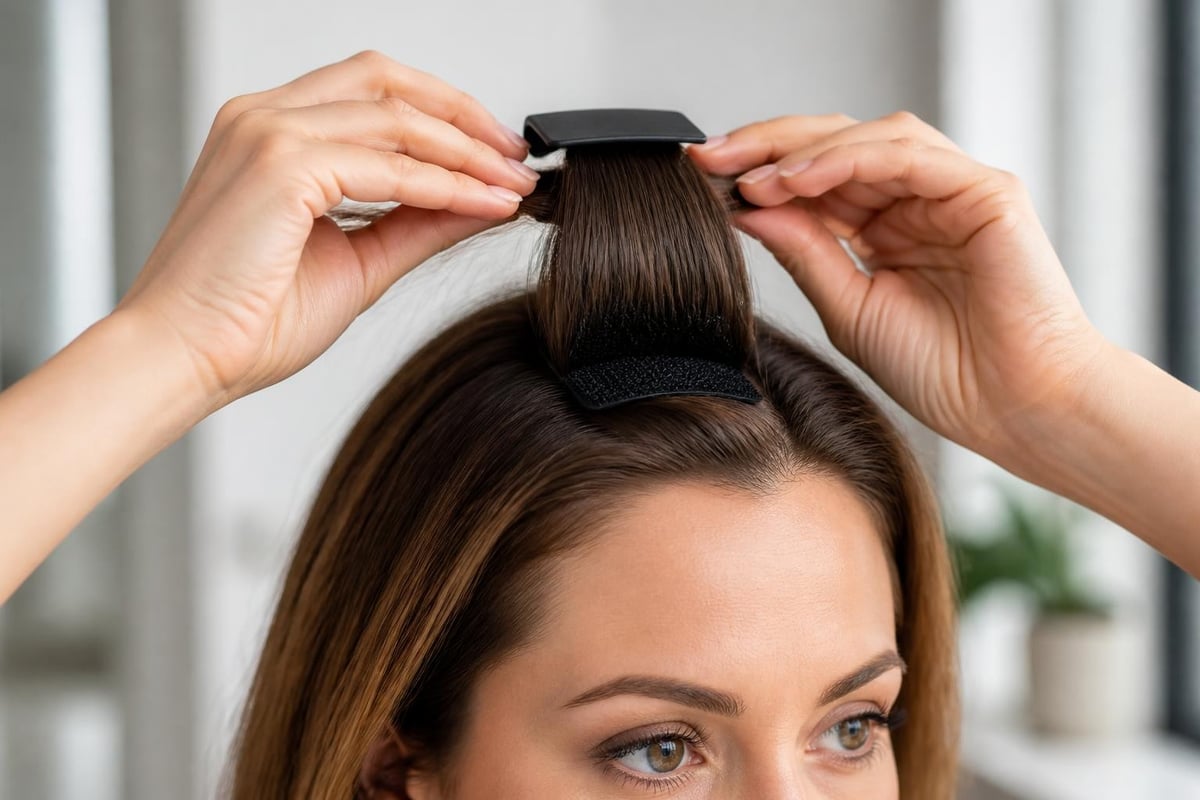
The mechanics behind volumizing hair clips are deceptively simple. Unlike traditional hot rollers that reshape hair with heat, these clips use tension and grip to hold your roots in an elevated position while your hair naturally sets around them.
Here's what happens when you use them correctly:
- The soft fabric surface grips the hair shaft without slipping
- Your roots lift away from the scalp at a 90-degree angle
- Hair cools and sets in this elevated position
- Natural body memory develops at the root zone
- Volume stays locked in after you remove the clips
The process works because you're working with your hair's natural tendency to hold a shape after being positioned. When you clip the roller onto dry hair at the crown, your roots lift as the hair sets around the fabric roller. After 10-20 minutes, you remove the clips to reveal lasting volume that doesn't require backcombing or heat damage.
The Science Behind the Set
I've watched countless clients discover that their hair holds volume better with this method than with traditional teasing. That's because you're not disrupting the hair cuticle or creating friction damage. The soft fabric grips the outer layer gently while the clip holds everything in position. Your hair's hydrogen bonds reform in this lifted state, which is the same principle behind why a blowout holds its shape.
Who Benefits Most from Volumizing Hair Clips
Not every hair type responds equally to this technique. Through years of salon experience, I've identified specific situations where these clips deliver exceptional results and where they might not be the right choice.
Best candidates for volumizing hair clips:
- Fine to medium hair that falls flat within hours of styling
- Straight hair that lacks natural body at the crown
- Post-blowout root boost to extend salon results
- Second-day hair that needs refreshing
- Anyone avoiding heat damage but wanting styled volume
Less effective for:
- Very thick, coarse hair that resists setting
- Extremely curly or kinky textures
- Hair shorter than chin length (not enough length to wrap around the clip)
- Soaking wet hair (too heavy to hold the lifted position)
If you're someone who spends 20 minutes with a round brush and blow dryer only to have your roots flatten by lunchtime, these clips solve that exact problem. They work particularly well for those with fine hair who want volume without the weight of styling products or the damage from daily heat styling.
And if your hair lands in that too-short-to-wrap category -- pixies, crops, fringe, or fine hair that just will not hold a clip -- I reach for a texture comb for root volume instead. It builds lift right at the scalp with no wrapping required.

Step-by-Step Application Guide
The technique matters more than the tool itself. I've seen clients buy volumizing hair clips and get minimal results simply because they placed them incorrectly or removed them too soon. Follow these steps for salon-quality lift.
Step 1: Choose Your Mode, Damp Overnight or Dry Refresh
The clips work by setting your hair in an elevated position, and there are two ways to get that set. For maximum lift, clip them into damp hair at night, sleep on them, and unclip in the morning. For a fast refresh on already-dry hair, clip them in for 10 to 15 minutes. What does not work is soaking wet hair, which is too heavy to hold the lifted position. Damp means towel-dried and roughly 70 to 80 percent dry, not dripping.
Step 2: Section Your Crown Area
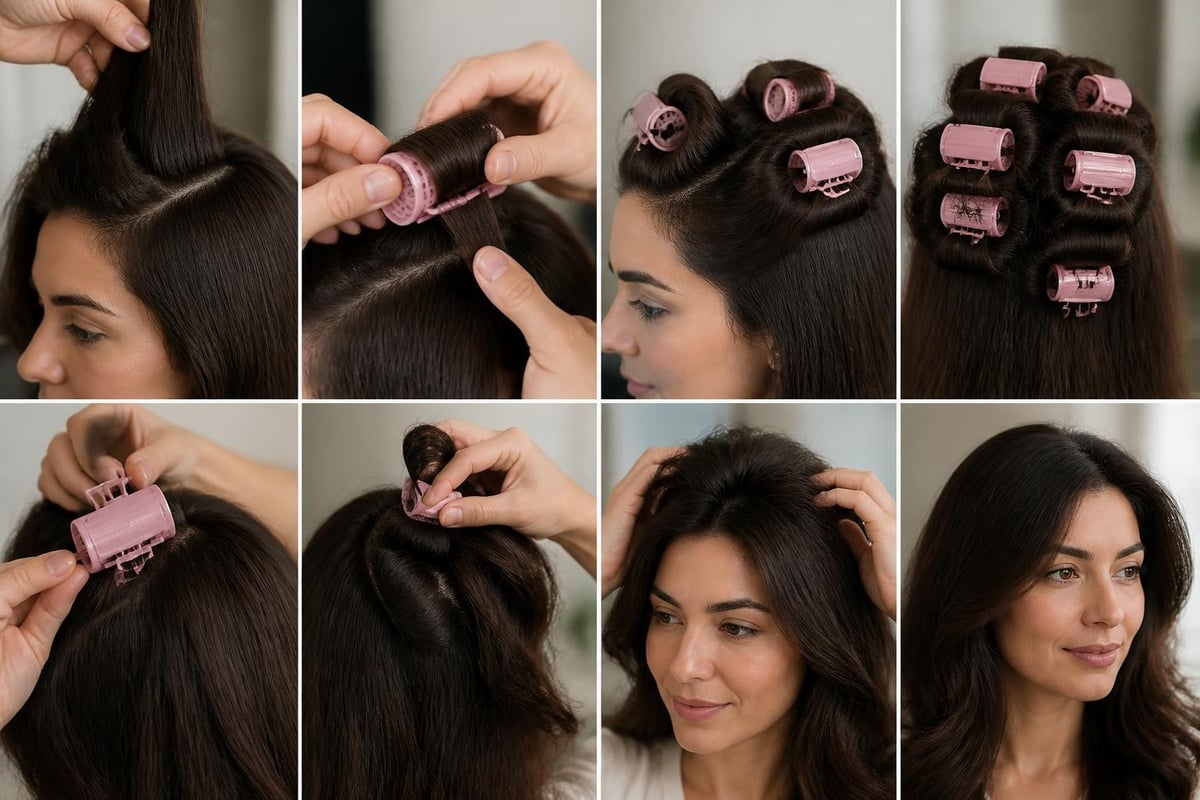
Divide the top section of your hair where you want volume. For most people, this is a rectangular section from the hairline back about 3-4 inches and side to side about 2-3 inches wide. Use a rattail comb to create clean sections.
Step 3: Position the First Clip at the Root
Here's where most mistakes happen. Take a small section of hair (about 1-2 inches wide) and hold it straight up from your scalp. Roll the volumizing clip down toward your scalp so the fabric roller grabs the hair close to the roots. The clip should sit snugly against your scalp without any gap.
Step 4: Add Additional Clips in a Pattern
Work backward from your hairline toward the crown. Each clip should be placed about 2 inches behind the previous one. For maximum volume, I recommend using 3-5 clips depending on the size of your crown area. The Volumizing Roller Clips ship two to a set, so full-crown coverage takes two or three sets.
| Clip Position | Placement Zone | Purpose |
|---|---|---|
| Clip 1 | Hairline to 2 inches back | Front framing volume |
| Clip 2 | Mid-crown | Central lift |
| Clip 3 | Crown apex | Maximum height point |
| Clips 4-5 | Optional back sections | Extended volume |
Step 5: Wait the Full Time
Set a timer for 15-20 minutes. Don't remove them early. The longer you leave them in (within reason), the better the set. I often have clients put them in while doing their makeup or having coffee. If your hair is thick or still holding any dampness, push it to the full twenty.
Step 6: Remove Gently and Set
Unroll each clip carefully in the reverse direction from how you applied it. Don't pull or tug. Once all clips are removed, flip your head upside down and gently shake at the roots. Flip back up and use your fingers to arrange the volume into your desired shape.
Common Mistakes That Kill Your Volume
I've corrected these errors hundreds of times in the salon. Even when clients think they're following the steps, small missteps sabotage their results.
Clipping Too Far from the Root
If there's a gap between the clip and your scalp, you're creating volume in the mid-shaft instead of at the root where you need it. The lift has to start at the scalp line. Press each clip firmly against your head as you roll it down.
Leaving Them In Too Short
Five minutes isn't enough. Your hair needs time to cool and set in the elevated position. Rushing the process means the volume falls out within an hour. The minimum effective time is 10 minutes, but 15-20 delivers noticeably better hold.
Using Them on Soaking Wet Hair
Soaking wet hair does not set. It is too heavy and it just sits there. Towel-dry and rough-dry to about 70 to 80 percent before you clip in for an overnight set, or work on fully dry hair for a 10 to 15 minute refresh. Either way, the hair has to be light enough to hold the lifted position.
Overloading with Product Before Application
Heavy serums, oils, or creams weigh down the hair and prevent the set from forming. If you're going to use product, apply a light volumizing mousse to damp hair before drying, then use the clips on the dried result. Don't add more product right before clipping.
Using Too Few Clips
One clip won't create the effect you're looking for. You need strategic placement across the entire crown area to get balanced, natural-looking lift. Most people need at least three clips to see a noticeable difference.
The Salon Trick for Polished Volume
Here's the technique I use with clients who want both volume at the crown and a sleek, polished hairline. The combination creates a professional finish that looks intentional rather than just "big hair."
Before you clip in your volumizing roller clips, apply a Hair Finishing Stick along the hairline and part line. This alcohol-free formula smooths flyaways and baby hairs without the stiffness or crunch of traditional edge control products. The mascara-style wand lets you target exactly where you want control.
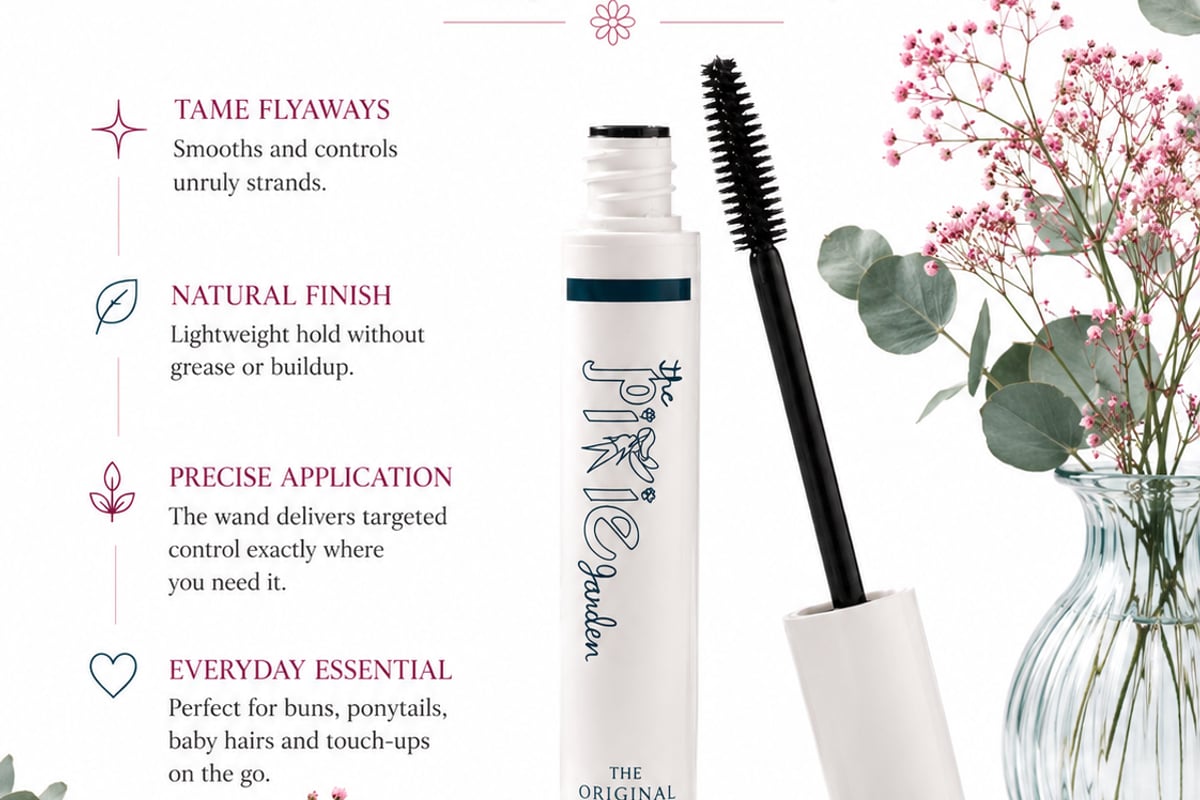
When you remove the clips 15-20 minutes later, you get dramatic volume at the crown paired with a smooth, polished frame around your face. The contrast is what makes the style look professional instead of just voluminous. The finishing stick holds those framing pieces in place all day without competing with the lift you've created at the roots.
This combination works exceptionally well for:
- Sleek ponytails with height at the crown
- Half-up styles that need structure
- Blowouts that require extra root lift
- Fine hair that tends toward flyaways when you add volume
How Long Does the Volume Last?
The honest answer depends on your hair type, the weather, and what you do after removing the clips. Under normal conditions with properly applied clips, expect 6-8 hours of noticeable volume. Fine hair might see 4-6 hours, while medium hair can push 8-10 hours.
Several factors affect longevity:
- Hair texture: Fine hair loses volume faster than medium textures
- Humidity: Moisture in the air relaxes the set
- Product use: Light finishing spray extends hold
- Physical activity: Exercise and movement flatten roots sooner
- Hair length: Shorter styles (shoulder length) hold volume longer than very long hair
For special events, I recommend applying the clips as close to your departure time as possible. If you're getting ready for an evening event, put them in during the final stages of your makeup routine.
Combining Volumizing Clips with Other Techniques
These clips integrate well into broader styling routines. They're not meant to be your only tool, but rather an efficient addition to your existing methods.
With Heat Styling
If you normally blow-dry your hair, use a round brush to create your overall shape, then add volumizing clips at the crown while your hair cools. This extends the life of your blowout significantly. Similarly, after using my XL Ceramic Thermal Rollers on your mid-lengths and ends, add these clips at the roots for multi-dimensional volume.
With Second-Day Hair
This is where volumizing hair clips really shine. On day two or three when your roots start to flatten, you don't need to rewash and restyle everything. Clip in the rollers for 15 minutes while you're getting ready, and your hair looks freshly styled again. Many of my clients use them exclusively for this purpose.
With Protective Styling
If you're trying to minimize heat damage, these clips give you styling versatility without thermal tools. You can create volume and shape using just the clips and your natural texture, which is particularly valuable for those growing out damage or maintaining healthy hair.
Choosing Quality Volumizing Hair Clips
Not all clips are created equal. The differences in construction directly affect your results and how long the clips remain functional.
Key features to look for:
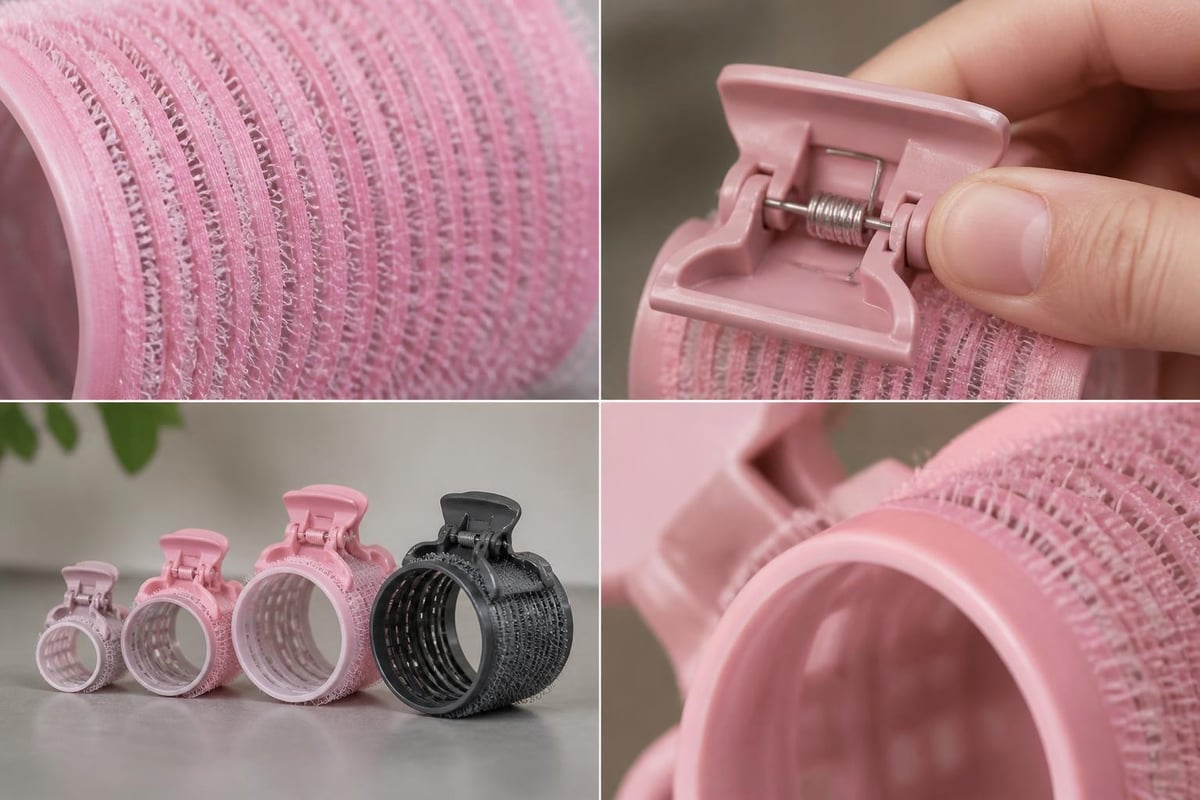
- Full fabric coverage: The soft fabric should wrap the whole roller barrel, not just strips
- Strong clip mechanism: Cheap clips lose tension after a few uses and won't stay in place
- Appropriate size: Too small won't create enough lift; too large becomes uncomfortable
- Smooth roller edges: Rough edges can snag and damage hair
- Heat-resistant material: Even though you're not applying heat, hair dryer proximity shouldn't warp them
At The Pixie Garden, I selected clips that meet professional salon standards because I've seen too many clients frustrated with dollar-store versions that break or slip. Quality clips last years with regular use, making them a worthwhile investment for anyone serious about maintaining volume.
Troubleshooting Flat Results
If you've followed the steps and still aren't seeing the volume you expected, one of these issues is usually the culprit.
Problem: Volume Disappears Within an Hour
Likely causes:
- Removed clips too early (less than 10 minutes)
- Hair was slightly damp when you applied them
- Didn't clip close enough to the scalp
- Used heavy products before application
Solutions: Ensure hair is bone dry, leave clips in for the full 15-20 minutes, position them directly against your scalp, and keep products light or skip them entirely before clipping.
Problem: Clips Won't Stay in Place
Likely causes:
- Hair is too slippery from conditioning treatments
- Clip mechanism is worn out or defective
- Trying to clip too much hair in one section
Solutions: Apply clips to day-old hair rather than freshly conditioned hair, replace worn clips, and take smaller sections when rolling the clips in.
Problem: Dents or Creases in Hair
Likely causes:
- Rolling the clip against a dry, un-cushioned section rather than smoothing the hair around the fabric roller first
- Rolling the clip too tightly
- Hair texture is very fine and susceptible to marking
Solutions: Roll with moderate tension instead of pulling tightly, smooth the section flat around the fabric roller before you close the clip, and use wider rollers that distribute pressure more evenly. Wear time is not the problem. These clips are made to be slept in, and an overnight set is the way to get the most lift out of them.
Real-World Timing and Routine Integration
The beauty of volumizing hair clips is how easily they fit into existing routines without adding significant time. Here's how I integrate them into different morning schedules.
| Morning Type | Routine Integration | Total Added Time |
|---|---|---|
| Quick (15 min) | Clip in first, do makeup, remove before leaving | 0 minutes (multitask) |
| Standard (30 min) | Apply after drying, leave in during breakfast | 0 minutes (multitask) |
| Extended (45+ min) | Multiple clip sessions at crown and sides | 5-10 minutes |
The key is understanding that the 15-20 minute set time doesn't have to be dedicated waiting time. You're already getting ready. The clips just sit in your hair while you do everything else.
Professional Results at Home
What I appreciate most about volumizing hair clips is how they democratize professional styling. Clients who couldn't achieve salon volume with a blow dryer and round brush suddenly have consistent results every morning. The technique removes the skill barrier that makes professional styling intimidating.
You don't need years of cosmetology training to position a clip at your roots. You don't need expensive tools beyond the clips themselves. And you don't need perfect technique on your first attempt because the learning curve is minimal compared to other volumizing methods.
The transformation I see most often is clients who previously thought their hair "just won't hold volume" discovering that it absolutely will with the right approach. Fine hair especially responds beautifully to this method because you're not weighing it down with products or damaging it with excessive heat.
Maintaining Your Clips for Longevity
Like any beauty tool, proper care extends the functional life of your volumizing hair clips significantly. I've had the same set in my kit for over three years because I follow basic maintenance practices.
Care guidelines:
- Remove hair from the fabric roller after each use with a fine-tooth comb
- Wash clips monthly with gentle shampoo and warm water
- Air dry completely before storing to prevent mildew
- Store in a drawer or container where they won't get crushed
- Replace clips when the fabric loses significant grip or the clip mechanism weakens
Clean fabric grips better, which means better hold at the roots. Hair product buildup on the clips reduces their effectiveness, so that monthly cleaning isn't optional if you want consistent results. The small maintenance investment keeps them working like new.
Beyond the Crown: Other Applications
While most people use volumizing hair clips at the crown, they work anywhere you want to add lift or set a specific shape.
Alternative placements:
- Along the sides of a center part for width and fullness
- At the nape before a low bun for height at the base
- Under layers to create separation and dimension
- At the temples to lift face-framing pieces away from the face
For special occasions, I've used these clips strategically throughout updos to create specific shapes and volume pockets that hold throughout the event. They're particularly useful for bridal styling when you need hair to maintain structure for 8-10 hours.
The No-Damage Advantage
In 2026, more people prioritize hair health alongside styling results. Heat damage from daily blow-drying and flat ironing accumulates over months and years, leading to breakage, split ends, and overall weakening of the hair shaft. Volumizing hair clips offer a genuinely damage-free alternative.
There's no heat. No tension pulling. No teasing that roughens the cuticle. Just gentle hold while your hair sets naturally. For clients recovering from chemical treatments, heat damage, or simply trying to grow healthier hair, this method preserves integrity while still delivering styled results.
The hair accessories at The Pixie Garden are selected with this philosophy in mind. Professional results shouldn't require sacrificing hair health, and tools that work with your hair's natural properties rather than against them deliver better long-term outcomes.
Different Techniques for Different Occasions
The basic method stays consistent, but you can modify application based on what you're styling for.
Everyday casual volume: Apply 2-3 clips at the crown for 10-15 minutes. Quick, natural lift that doesn't look overly styled.
Professional/office styling: Use 4-5 clips from hairline to crown, leave in for 20 minutes, finish with a light hold spray. Polished, intentional volume.
Evening/special event: Strategic placement with 5-6 clips, 20-25 minute set time, finish with smoothing product on the lengths to contrast the volume at the roots.
Post-workout refresh: Quick 10-minute application at the crown only to revive flattened roots without full restyling.
Adjusting the number of clips, placement pattern, and timing gives you control over the intensity and style of volume. It's a flexible technique that scales to your needs rather than delivering the same result every time.
Volumizing hair clips deliver professional root lift without heat damage, working best when applied to completely dry hair at the scalp and left in for 15-20 minutes. The technique requires minimal skill but rewards proper placement and timing with hours of lasting volume. Whether you're refreshing second-day hair or extending a blowout, The Pixie Garden carries salon-quality volumizing clips and complementary styling products designed by a licensed cosmetologist to help you achieve polished, effortless volume every day.
Related reading: For the complete walkthrough on prep, sectioning, moisture level, and timing, see our in-depth guide: How to Use Volumizing Roller Clips for Maximum Volume.
Where I Send Clients Next for More Volume
These are the other guides I keep on hand for clients working on lift, written from over 25 years behind the chair.
- My full playbook for how to get volume in flat hair -- the wash, dry, and product decisions that happen before a single clip goes in.
- Using a teasing comb for volume without wrecking the cuticle -- the gentle backcombing method I use at the crown when clips alone are not enough for an event.
- Foam rollers, and when I still reach for them -- the soft overnight option if you want curl and body set while you sleep instead of a fifteen-minute clip set.
