

How to Use Claw Hair Clips: A Licensed Cosmetologist's Guide
Delena MarklandThe key to a claw clip that actually holds is the twist-and-clip method: gather your section at the nape or crown, twist it upward with controlled tension, fold the tail back toward your scalp, then set the clip so its teeth bite directly into the twist's roots rather than just resting on top. After fifteen years working behind the chair, I've taught this technique to hundreds of clients who complained their clips always slipped out by lunchtime, and the difference comes down to understanding exactly how the clip's teeth engage with twisted hair versus loose hair.
Understanding Claw Clip Mechanics and Hair Sectioning
Before you touch a claw clip, you need to understand why most people struggle with them. The clip's teeth are designed to grip twisted or compressed hair, not loose strands lying flat against your head. When you simply gather hair and snap a clip over it, you're relying on friction alone, which fails the moment you move your head or add any weight to the style.
Proper sectioning determines whether your clip holds for ten minutes or ten hours. Start by identifying your anchor point: the nape for low styles, the crown for mid-height updos, or the occipital bone (the bump at the back of your skull) for half-up styles. Run your fingers through your hair to check for tangles, then gather your section using both hands to maintain even tension.
Section size matters more than clip size. A section that's too thick won't twist properly, creating a bulky mass that pushes the clip's teeth apart. A section that's too thin won't provide enough surface area for the teeth to grip. For medium-density hair, your gathered ponytail should be roughly the diameter of a quarter before twisting.
The Complete Twist-and-Clip Technique
Learning how to use claw hair clips effectively requires breaking down each movement into precise steps. I developed this exact sequence after watching countless clients struggle in my chair, and it eliminates the three most common failure points: insufficient twist tension, incorrect clip angle, and poor tooth placement.
Step 1: Gather and Elevate
Hold your section at the base with your non-dominant hand. Position your grip exactly where you want the clip to sit, not higher or lower. Pull the section straight up from your scalp at a 90-degree angle. This elevation creates the foundation for everything that follows.
Step 2: Create the Twist
Using your dominant hand, begin twisting the section clockwise (or counterclockwise, whichever feels natural). Apply consistent tension as you twist, keeping the hair taut but not so tight it causes discomfort. Continue twisting until the section forms a rope-like column. You'll know you've twisted enough when the hair naturally wants to coil back on itself.
Step 3: Fold and Tuck
This is where most people deviate and lose their hold. Instead of letting the twisted section stand upright, fold the entire tail back toward your scalp, creating a loop. The tail should point downward, parallel to your neck or head. This fold compresses the twist and creates a dense target for the clip's teeth.
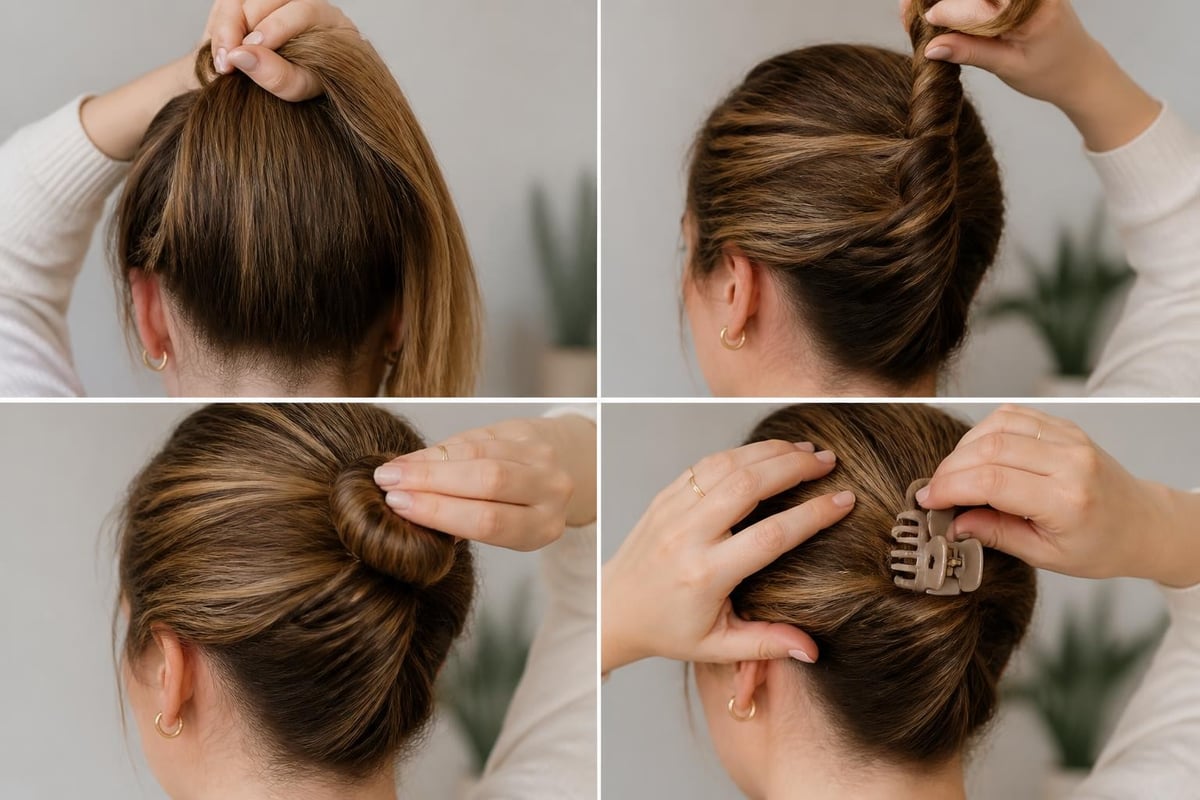
Step 4: Position the Clip
Open your claw clip with your free hand. Position the bottom jaw beneath the folded twist, as close to your scalp as possible. The teeth should aim directly into the twist's base, not across it. Angle the clip slightly downward, not perpendicular to your head. Close the clip firmly, ensuring both rows of teeth penetrate the twist completely.
Clip Angle and Tooth Engagement
The angle at which you set your clip determines whether it slides out in an hour or stays put all day. I had a client last month whose large square claw clip kept falling out during her workday, and the solution was a 15-degree adjustment in clip placement.
The optimal angle is 30 to 45 degrees downward from perpendicular. When you position the clip perpendicular to your head (straight out at 90 degrees), gravity constantly pulls on the weight of your hair, loosening the teeth's grip. When you angle the clip downward, you're working with gravity instead of against it. The weight of your hair presses into the clip's grip rather than pulling away from it.
Test your placement by gently tugging on the clipped section. If the clip shifts immediately, it's not properly engaged. You should feel resistance, and the clip should hold firm even with moderate pulling. If it slides, open the clip, retighten your twist, and reset with a more aggressive downward angle.
| Clip Position | Hold Duration | Best For | Common Issues |
|---|---|---|---|
| Perpendicular (90°) | 1-2 hours | Fine, short hair | Slides with head movement |
| Slight angle (30°) | 4-6 hours | Medium density | May loosen with activity |
| Downward angle (45°) | 8+ hours | Thick, long hair | Requires practice to position |
| Upward angle | Not recommended | None | Immediate slippage |
Addressing Clips That Slip or Slide
Even with perfect technique, certain hair conditions cause clips to fail. Understanding why clips slip allows you to make targeted corrections rather than abandoning the style entirely.
Slippery, freshly washed hair is the number one culprit. Hair that's too clean lacks the slight texture that gives clips something to grip. If you're working with same-day washed hair, add dry shampoo or texturizing spray to your section before twisting. The product creates friction between strands, helping the twist hold its shape and giving clip teeth better purchase.
Insufficient twist tension creates a loose column that compresses under the clip's pressure. When you twist without enough tension, the hair can unwind slightly after you clip it, reducing the diameter of the section and allowing the teeth to lose their grip. The fix is simple: twist until you see the hair beginning to coil back on itself, then add two more full rotations before folding.
Fine or slippery hair types benefit from the stack-and-twist modification. Instead of creating a single smooth twist, backcomb your section lightly at the roots before twisting. This creates interior texture that prevents the twist from compressing too much when clipped. The added volume also increases the section's diameter, giving larger clips better surface area to grip.
The Jumbo Lay Flat Oval Advantage
Not all claw clips are created equal, and the design differences directly impact hold time and styling versatility. The Jumbo Lay Flat Oval Claw Clip I use in my salon features an extended tooth length and oval-shaped jaw that distributes pressure more evenly across thick sections compared to traditional rectangular clips.
The lay-flat design addresses a specific problem: standard claw clips create a pronounced bump where the clip's hinge sits against your head. This works fine for casual updos, but it's problematic when you want a sleeker profile or need to wear a hat comfortably. The oval shape positions the bulk of the clip horizontally along your head's curve rather than projecting outward.
For thick or long hair past shoulder length, tooth length is critical. Short teeth (under 10mm) can't penetrate deeply enough into a substantial twist to create real hold. The jumbo clips feature 15mm teeth that reach through dense sections to anchor at the twist's core. When you're learning how to use claw hair clips on thick hair, starting with longer teeth gives you a margin of error that standard clips don't provide.
Managing Flyaways and Finishing Details
A secure clip doesn't automatically mean a polished look. Baby hairs around your hairline and flyaways along the twisted section can make even perfectly executed technique look messy. This is where targeted finishing makes the difference between a casual look and a professional result.
Before you clip, address your hairline. The Hair Finishing Stick is designed specifically for this finishing step, using a precision wand to smooth baby hairs and edge control without the stiffness or residue of traditional gels. The mascara-style applicator lets you target exactly the hairs you want to tame while leaving the rest of your style's texture intact.

Apply the finishing stick after you've set your clip, not before. Run the wand along your hairline in the direction you want hairs to lay, using light pressure. For flyaways along the twist itself, gently smooth the wand over the twisted section before clipping. The alcohol-free, water-based formula provides flexible hold that moves with your hair rather than creating a crunchy helmet effect.
Timing your finishing steps correctly prevents rework. If you smooth flyaways before twisting, the twisting motion will pull them loose again. If you apply product to your entire section before gathering, you add weight that can cause slippage. The professional sequence is: gather, twist, clip, then finish the visible areas.
Real Chair-Side Problem Solving
Last week, a client came in frustrated because her clip "just wouldn't stay" no matter what she tried. She demonstrated her technique, and I immediately spotted the issue: she was gathering her section, creating a ponytail shape, then clipping across the ponytail without any twist at all. The clip was essentially functioning as a weak hair tie, relying entirely on the teeth biting through multiple layers of loose hair.
I had her start over using the twist-and-clip method. She gathered the same section, but this time twisted it completely until it coiled. When she folded the tail back and I guided her clip placement (teeth angled downward, biting into the twist's base), the difference was immediate. She shook her head vigorously, and the clip didn't budge. The change wasn't a different clip or product; it was understanding that the twist creates the structure the clip needs to grip.
The angle adjustment that solved her problem was moving from perpendicular to 40 degrees downward. With her hair's medium-fine texture and length just past her shoulders, the perpendicular angle created enough leverage for the weight of her hair to gradually work the clip loose. The downward angle shortened that leverage arm and positioned the clip's teeth to compress the twist against her scalp rather than pulling away from it.
Comparing Twist-and-Clip to Stack-and-Pin Methods
Understanding alternative techniques helps you choose the right approach for different situations. The stack-and-pin method, where you coil your section into a bun shape and secure it with a clip from above, offers different advantages than twist-and-clip.
Speed comparison: Stack-and-pin takes roughly 30 seconds once you're practiced. Twist-and-clip requires 45-60 seconds for proper tension and placement. For quick morning routines, stack-and-pin wins on speed.
Hold comparison: Twist-and-clip provides superior hold for active lifestyles. The twisted column creates a structural element that resists movement in multiple directions. Stack-and-pin relies more on the clip holding the weight of a coiled section, which can loosen if you're bending, exercising, or moving your head frequently.
- Twist-and-clip excels for: All-day wear, professional settings, active schedules, thick or heavy hair
- Stack-and-pin excels for: Quick styling, casual looks, shorter hair lengths, decorative clip display
- Both methods work well for: Medium-density hair, mid-height placement, textured or second-day hair
The techniques aren't mutually exclusive. I often use twist-and-clip for my base security, then add a second smaller clip using stack-and-pin for decorative purposes. The primary clip does the structural work while the secondary clip adds visual interest. You can see more styling versatility covered in our comprehensive claw clip guide, which explores multiple approaches for different hair types and occasions.
Tension Control and Hold Duration Specifications
Quantifying twist tension takes practice, but specific markers help you calibrate correctly. When you twist your section, you should feel moderate resistance, similar to wringing out a wet towel gently. Too loose, and the twist will compress under the clip. Too tight, and you risk discomfort or even tension headaches during extended wear.
Target tension produces a twist that holds its shape when you release your grip for 2-3 seconds. If the twist immediately unwinds when you let go, you need more rotations. If your scalp feels pulled or uncomfortable, you've exceeded optimal tension. The sweet spot creates a firm column that maintains its diameter without causing pain.
Hold duration correlates directly with three measurable factors: twist tightness, clip tooth penetration depth, and clip angle. In my testing with clients wearing the same style throughout their workday:
| Tension Level | Tooth Penetration | Clip Angle | Average Hold Time |
|---|---|---|---|
| Loose | Shallow (surface) | Perpendicular | 1-2 hours |
| Moderate | Medium (mid-twist) | 30° downward | 4-6 hours |
| Firm | Deep (to roots) | 45° downward | 8-12 hours |
| Very tight | Deep (to roots) | 45° downward | 8-12 hours (with discomfort) |
The moderate-to-firm range delivers the best balance of comfort and performance. Very tight twists don't significantly improve hold time but do increase the likelihood of headaches or scalp sensitivity. When learning how to use claw hair clips for maximum longevity, focus on clip angle and tooth penetration before increasing twist tension beyond comfortable levels.
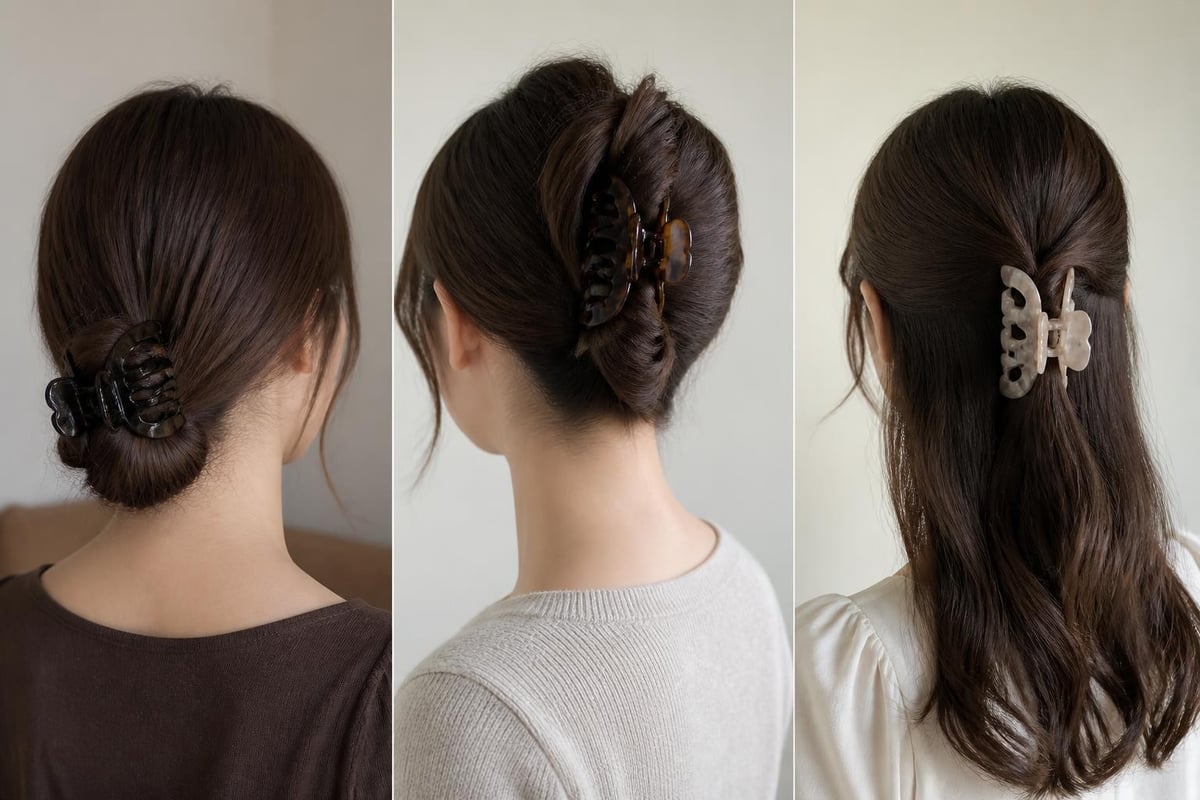
Sectioning Strategies for Different Placement Points
Where you position your clip determines which sectioning pattern works best. The mechanics of how to use claw hair clips change slightly depending on whether you're creating a low nape style, a crown updo, or a half-up look.
Low nape placement (base of skull): Gather all hair from your crown down to your nape, keeping the section clean across the width of your head. Tilt your head forward slightly to allow gravity to help gather the section smoothly. This placement point provides maximum stability because the clip rests against the solid foundation of your skull base.
Crown placement (top of head): Section horizontally from ear to ear, leaving the bottom half of your hair down. The crown position requires more attention to clip angle because there's less structural support from your skull. Angle the clip more aggressively downward (closer to 45 degrees) to compensate for the curved surface of your crown.
Half-up placement (occipital bone area): Create a horizontal part from the top of one ear, across your crown, to the top of the other ear. This placement point hits the occipital bone, which provides a natural ledge for the clip to rest against. The bone's prominence helps anchor the clip and prevents downward slippage.
For clients with navy blue or pink claw clips that coordinate with specific outfits, placement point also affects how much of the clip shows. Crown placement makes the clip a focal point, while low nape placement keeps it subtle and functional.
Advanced Modifications for Challenging Hair Types
Some hair characteristics require technique adjustments beyond basic twist-and-clip. Extremely fine hair, very thick hair, and slippery straight hair each present specific challenges that standard instructions don't address.
For fine or thin hair: Create volume before twisting by backcombing the interior of your section lightly. Don't backcomb the outer layer that will show. This interior teasing builds a thicker twist diameter without visible texture. Use a medium-size clip rather than a large one, as oversized clips can overwhelm fine hair sections and slide due to insufficient mass.
For very thick or coarse hair: Divide your section into two smaller subsections, twist each separately, then twist them together into a rope-braid structure. This double-twist method creates a more manageable diameter than trying to twist the entire thick section as one unit. Use jumbo clips with extra-long teeth to penetrate the substantial twist depth.
For slippery straight hair: The texture issue requires product intervention. Apply dry shampoo or a light texturizing spray to dry hair before gathering your section. If you're working with freshly washed hair, consider postponing the style until day two, when natural oils provide grip. Alternatively, mist your gathered section lightly with water mixed with a small amount of sea salt spray, then blow-dry before twisting to add texture.
Troubleshooting Specific Failure Patterns
Different slip patterns indicate different technical errors. Recognizing the pattern helps you correct the specific mistake rather than abandoning the entire style.
Clip slides straight down: Your angle is too perpendicular, or you haven't folded the tail back toward your scalp. The clip is gripping the twist, but gravity is pulling it along the twist's length like a bead on a string. Solution: Reset with a more aggressive downward angle and ensure the folded tail points toward your scalp, not outward.
Clip rotates or twists to the side: Uneven tension in your twist creates an asymmetrical column that the clip can't grip uniformly. One side of the clip loses purchase and begins rotating around the section. Solution: Start over, maintaining even tension throughout the twisting process, and ensure you're gathering hair evenly from both sides of your section.
Clip pops open spontaneously: The section is too thick for the clip's jaw capacity, forcing the hinge mechanism beyond its designed range. The spring in the clip fatigues and releases. Solution: Use a larger clip, reduce your section size, or switch to the double-twist method for thick hair to compress the diameter.
Entire style loosens gradually: Insufficient twist tension allows the column to compress over time, reducing diameter and loosening the teeth's grip. Solution: Increase your twist rotations by three to four full turns and ensure you're twisting until the hair wants to coil back on itself naturally.
Integration with Other Styling Tools and Products
Claw clips work most effectively as part of a complete styling system rather than in isolation. The tools and products you use before clipping directly affect your results.
A smooth polish hair brush helps create the clean sections necessary for precise clip placement. Brush through your hair before gathering to eliminate tangles that create weak points in your twist. For naturally textured or curly hair, use a wide-tooth comb instead to avoid disrupting your curl pattern while still creating smooth sections.
Product sequencing matters. If you're using the Rice Water Shampoo and Conditioner Bar for volume-building benefits, allow hair to dry completely before attempting claw clip styles. Damp hair lacks the structural integrity to hold twists properly and will gradually loosen as it dries, taking your clip with it.
For special occasions when you want your clip to be a statement piece, consider handmade crochet clips that add texture and visual interest. The technique remains the same, but the decorative element becomes a focal point. Position these clips at crown height where they're most visible, using the twist-and-clip method to ensure they don't slip despite their ornamental appearance.
Professional Standards and All-Day Wear
Professional settings demand styles that maintain their integrity from morning meetings through evening events. When I'm preparing clients for full-day wear, I apply stricter standards than for casual styling.
The professional hold test: After setting your clip, perform three checks. First, tilt your head forward as if looking at your phone. The clip shouldn't shift. Second, turn your head quickly from side to side. The clip should remain stable. Third, reach back and tug gently on the clipped section. You should feel firm resistance with zero movement.
All-day wear requires considering factors beyond initial hold. Comfort becomes critical after hour four. A clip positioned with excessive downward angle may dig into your scalp during extended wear. The optimal angle for 8+ hour wear is 35-40 degrees, slightly less aggressive than the maximum 45-degree angle, balanced between security and comfort.
Maintenance checks throughout the day: At the four-hour mark, reach back and feel your clip position. If it has shifted slightly, remove it, retighten your twist with one or two additional rotations, and reset. This mid-day adjustment takes 15 seconds and can extend your style's life by several hours. Don't wait until the clip is visibly loose; proactive maintenance prevents complete failure.
The comparison between claw clips and other hair accessories highlights how proper technique elevates claw clips to professional-grade tools rather than casual conveniences. The difference between a clip that holds for two hours and one that lasts all day isn't usually the clip itself but rather the technique used to set it.
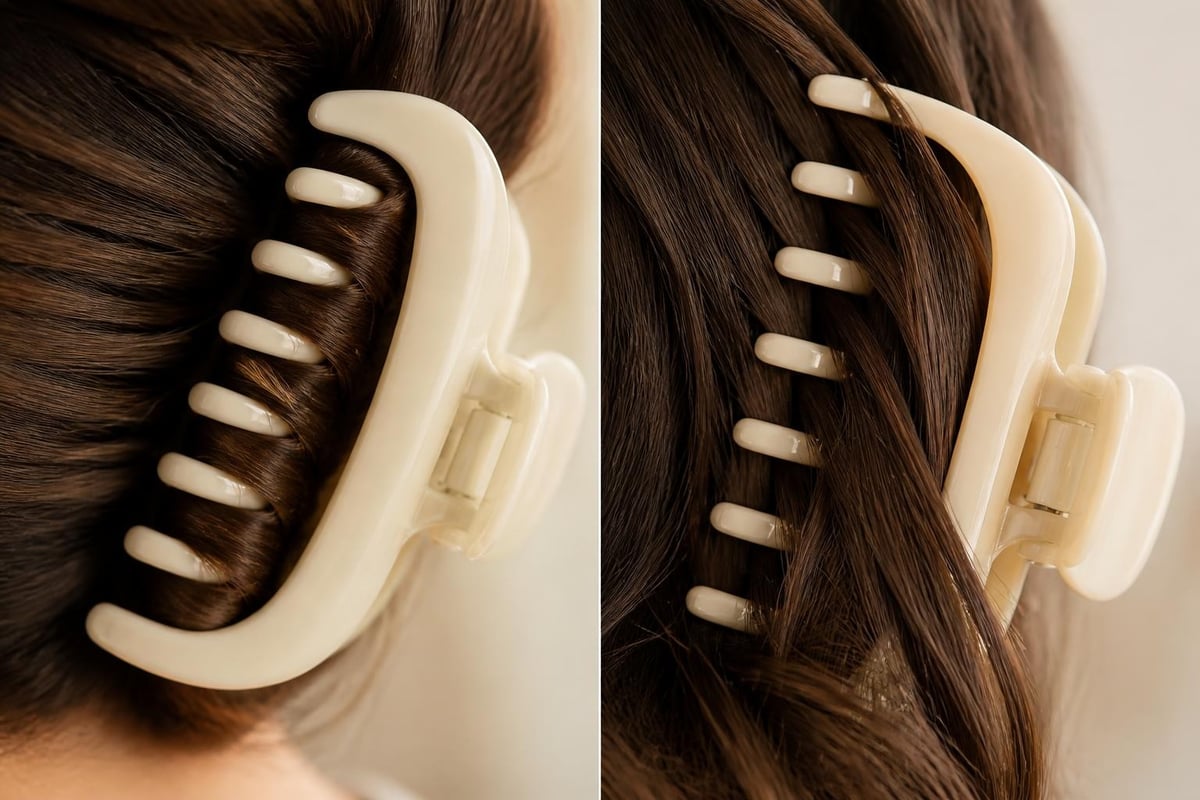
Variations in Clip Jaw Design and Tooth Pattern
Understanding your clip's specific design helps you adapt technique for optimal performance. Not all claw clips feature identical tooth patterns or jaw shapes, and these variations affect how you should position and secure them.
Straight parallel teeth grip twisted sections uniformly along the entire jaw length. These work best with the standard twist-and-clip method described above. Position them so all teeth engage the twist simultaneously for maximum hold.
Curved or wavy teeth create multiple contact points that can accommodate slightly uneven twists. These are more forgiving if your twist isn't perfectly uniform, making them good choices while you're learning how to use claw hair clips effectively. The curved pattern naturally follows the contour of a twist better than straight teeth.
Staggered tooth heights penetrate twists at different depths, creating a multi-layered grip. The longer teeth reach the twist's core while shorter teeth engage the outer layers. This design provides excellent hold for thick hair but requires ensuring the deepest teeth actually reach your twist's base rather than stopping at the surface.
The Physics of Hold: Why Technique Beats Clip Size
Many people assume larger clips automatically provide better hold, but physics tells a different story. Hold strength comes from tooth penetration depth and grip surface area, not overall clip size. A small clip used with proper twist-and-clip technique will outperform a large clip applied incorrectly to loose hair.
Grip surface area is the total amount of hair surface in contact with clip teeth. A tight twist concentrates more hair into less volume, increasing density. When teeth penetrate this dense twist, each tooth contacts more individual hair strands than it would gripping the same amount of loose hair spread across a larger area.
Leverage and mechanical advantage explain why clip angle matters so much. When positioned perpendicular, the entire weight of your hair acts on the clip with maximum leverage, like a long lever arm working to pry the clip open. When angled downward, you shorten that lever arm significantly, reducing the force trying to dislodge the clip.
Understanding these mechanical principles helps you troubleshoot. If your clip isn't holding, you can systematically address each factor: increase twist density (more rotations), improve tooth penetration (better fold-and-tuck), or optimize leverage (adjust angle downward).
Seasonal and Environmental Considerations
Environmental factors affect hair texture and clip performance. Humidity, temperature, and even seasonal hair shedding patterns influence how you should approach claw clip styling.
High humidity makes hair swell and become more textured, which actually improves grip for claw clips. You may need slightly less twist tension in humid conditions because the increased texture provides natural grip. However, humidity also causes frizz, making finishing techniques more important for polished appearance.
Winter dryness and static create slippery hair that clips struggle to grip. Combat this with leave-in conditioner or anti-static spray applied to your section before twisting. The slight moisture helps eliminate static while adding minimal weight. Avoid heavy oils that can make hair too slippery.
Seasonal shedding in fall and spring means you're working with a higher proportion of loose hairs mixed into your sections. These shed hairs can prevent clean twist formation. Brush thoroughly before gathering to remove loose hairs, and don't be surprised if you need to add an extra twist rotation to compensate for the slightly reduced density.
The evolution of claw clips in fashion demonstrates how this accessory has moved from purely functional to style-forward, but the underlying techniques for secure hold remain rooted in understanding hair mechanics and clip physics.
Frequently Asked Questions
How do I use a claw clip for half-up styles without slipping?
For half-up styles, section horizontally from ear to ear across your crown. Create a tight twist using the full twist-and-clip method, not just a loose gather. Position the clip at a 35-degree downward angle, ensuring the teeth bite into the twist at the occipital bone, which provides a natural ledge. The most common mistake with half-up styles is gathering without twisting, then wondering why the clip slides out. The twist is mandatory for secure hold, even when you're only clipping the top section.
What specific technique works for thick hair when clips won't close?
For thick hair that prevents clip closure, use the double-twist modification: divide your gathered section into two equal parts, twist each separately until tight, then twist both twisted sections around each other like a rope. This reduces the final diameter while maintaining all your hair in the style. Alternatively, use a jumbo clip with an extended jaw capacity. If your section is genuinely too thick for any available clip, create two separate twisted sections side by side and secure each with its own clip rather than forcing all hair into a single clip.
How can I make my claw clip hold all day without readjustment?
All-day hold requires three specific elements working together: twist tension firm enough that the column holds its shape for several seconds when you release it before clipping, tooth penetration deep enough to reach the twist's core (achieved by proper fold-and-tuck technique with the tail pointing back toward your scalp), and clip angle of 35-40 degrees downward to work with gravity rather than against it. Additionally, start with day-old hair or add dry shampoo for texture, as freshly washed hair is too slippery for maximum hold duration. The professional hold test (tilting head forward, turning side to side, gentle tugging) confirms proper setup before you leave home.
Does the twist-and-clip method work for fine hair that usually slips?
The twist-and-clip method actually works better for fine hair than loose gathering because twisting increases the effective diameter of your section. For fine hair specifically, add these modifications: lightly backcomb the interior of your section (not the visible outer layer) before twisting to create more volume and texture, use a medium-size clip rather than a large one so the teeth aren't spread too wide for the section diameter, and apply dry shampoo or texturizing spray to increase grip. Fine hair requires slightly more twist rotations than thick hair because you're starting with less natural volume to create the necessary diameter for tooth engagement.
Mastering the twist-and-clip method transforms claw clips from accessories that constantly slip to reliable styling tools that hold all day. The key differentiators are proper twist tension, strategic clip angle, and ensuring teeth penetrate the twist's base rather than resting on the surface. When you're ready to elevate your claw clip styling with professional-quality accessories and finishing products designed by a licensed cosmetologist, The Pixie Garden offers everything you need for polished, effortless styles that actually stay put.