

How to Use Ceramic Thermal Rollers for Salon Volume
Delena MarklandTo use ceramic thermal rollers correctly, start with smooth, nearly-dry hair, part it into two-inch panels, roll heated ceramic barrels from the ends up to the root in your desired style direction, allow them to cool completely for fifteen to twenty minutes so the ceramic sets the curl pattern, then release and brush out for volume that holds. That single sentence is the technique I teach every client who wants a blowout alternative that actually lasts, and it's the same method I use on my own hair before events when I need three-day hold without daily heat exposure.
I'm Delena Markland, a licensed cosmetologist and the founder of The Pixie Garden, and I've spent years testing heat styling tools in my chair to find what delivers professional results without the salon price tag or the damage profile of flat irons and curling wands. Ceramic thermal rollers became my go-to recommendation once I understood the science behind how ceramic distributes heat evenly and holds temperature long enough to reshape the hydrogen bonds in the hair shaft. When clients ask me how to use ceramic thermal rollers at home, I walk them through the exact process I'm sharing here, the one that turns a fifteen-minute morning routine into volume that survives humidity, second-day texture, and even a workout without falling flat.
Why Ceramic Thermal Rollers Outperform Other Heat Styling Tools
Ceramic material changes the heat styling equation because it holds and distributes warmth uniformly across the entire roller surface. Unlike metal or silicone alternatives that create hot spots, ceramic rollers transfer consistent heat to every section of hair wrapped around the barrel, which means you get predictable curl formation without the risk of scorching fine ends or under-processing thicker roots.
The thermal retention property is where ceramic truly separates itself from foam or fabric alternatives. When you heat ceramic rollers to their optimal temperature (usually between 300-350°F depending on the set you choose), the material continues radiating that warmth for the full cooling period, allowing the hair to set in its new shape as it gradually returns to room temperature. This slow cool-down is what locks in the style.
The XL Ceramic Thermal Rollers Advantage
I exclusively recommend the XL Thermal Rollers in Terracotta to my clients because the larger barrel diameter creates volume at the root without tight ringlets, which is exactly what most people want when they ask for "body" or "movement" rather than structured curls. The terracotta ceramic core heats quickly and holds temperature long enough to reshape medium to thick hair textures that don't respond well to traditional rollers.
The self-grip velvet flocking on these rollers eliminates the need for metal clips that can create dents or bend marks in the finished style. You simply roll the heated barrel up to the scalp and the tension holds everything in place while the ceramic does its work.
Step-by-Step Instructions: How to Use Ceramic Thermal Rollers
Learning how to use ceramic thermal rollers requires following a specific sequence that prepares the hair, applies the rollers correctly, and removes them at the right moment for maximum hold. I break this process into five distinct phases that I've refined over hundreds of client applications.
Phase One: Hair Preparation and Sectioning
Start with clean hair that's been blown approximately eighty-five to ninety percent dry. The hair should feel barely damp to the touch but not wet enough to drip or transfer moisture to your fingers. This moisture level is critical because ceramic rollers work by reshaping dry hair structure, and excess water will steam against the hot ceramic, which can cause frizz or uneven texture.
Apply a heat protectant spray from mid-shaft to ends, avoiding the root area where you want maximum lift. I prefer lightweight formulas that don't add oil or silicone weight to fine or medium textures.
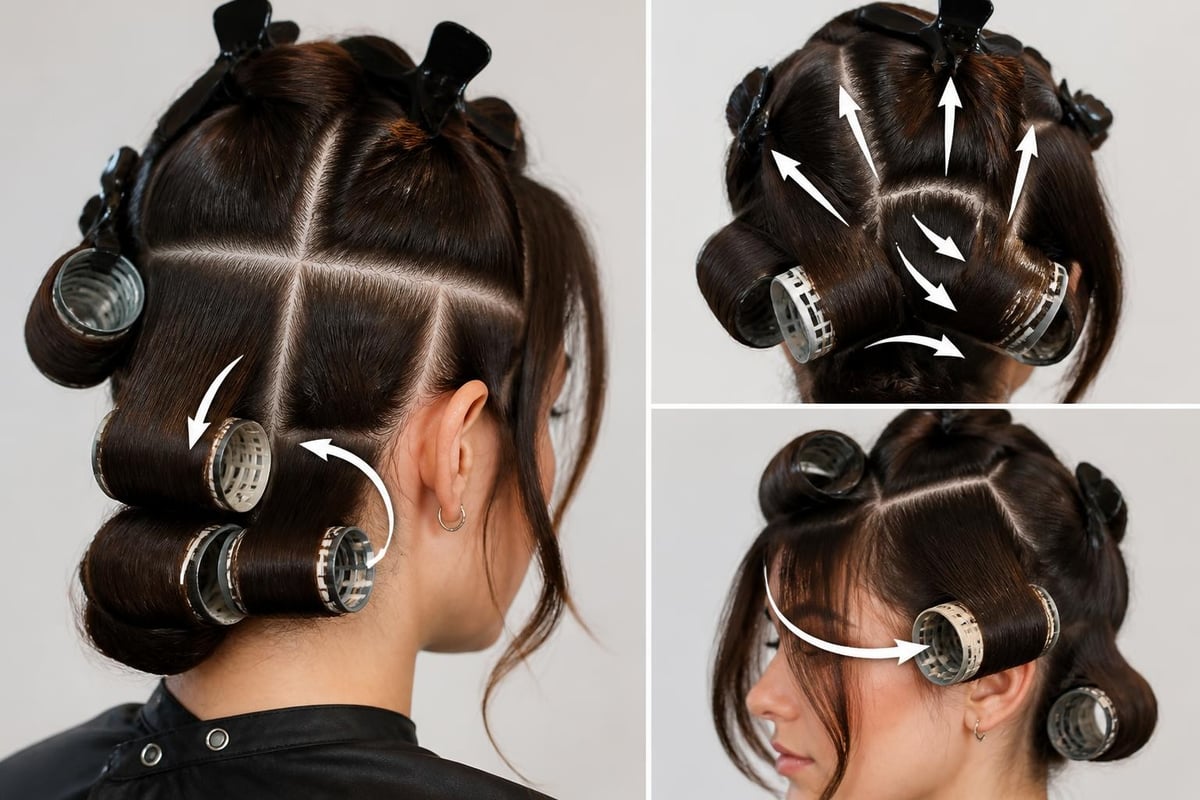
Sectioning technique for even coverage:
- Part your hair horizontally from ear to ear across the crown, creating top and bottom sections
- Clip the top section out of the way using a large claw clip to keep it secure
- Divide the bottom section into two-inch wide panels starting at the nape
- Each panel should be no wider than the length of your roller barrel
- Work from bottom to top, releasing new sections as you complete each layer
Phase Two: Heating the Ceramic Rollers
Place your ceramic rollers in their heating base according to the manufacturer's instructions. Most quality sets reach optimal temperature within eight to twelve minutes. The Kitsch ceramic thermal rollers that many professionals use have an indicator light that signals when they're ready.
Do not touch the ceramic barrel surface with bare fingers once heated. Use the cool-touch ends or the provided clips to handle each roller. The ceramic retains serious heat, easily enough to cause burns if you make contact with the barrel itself.
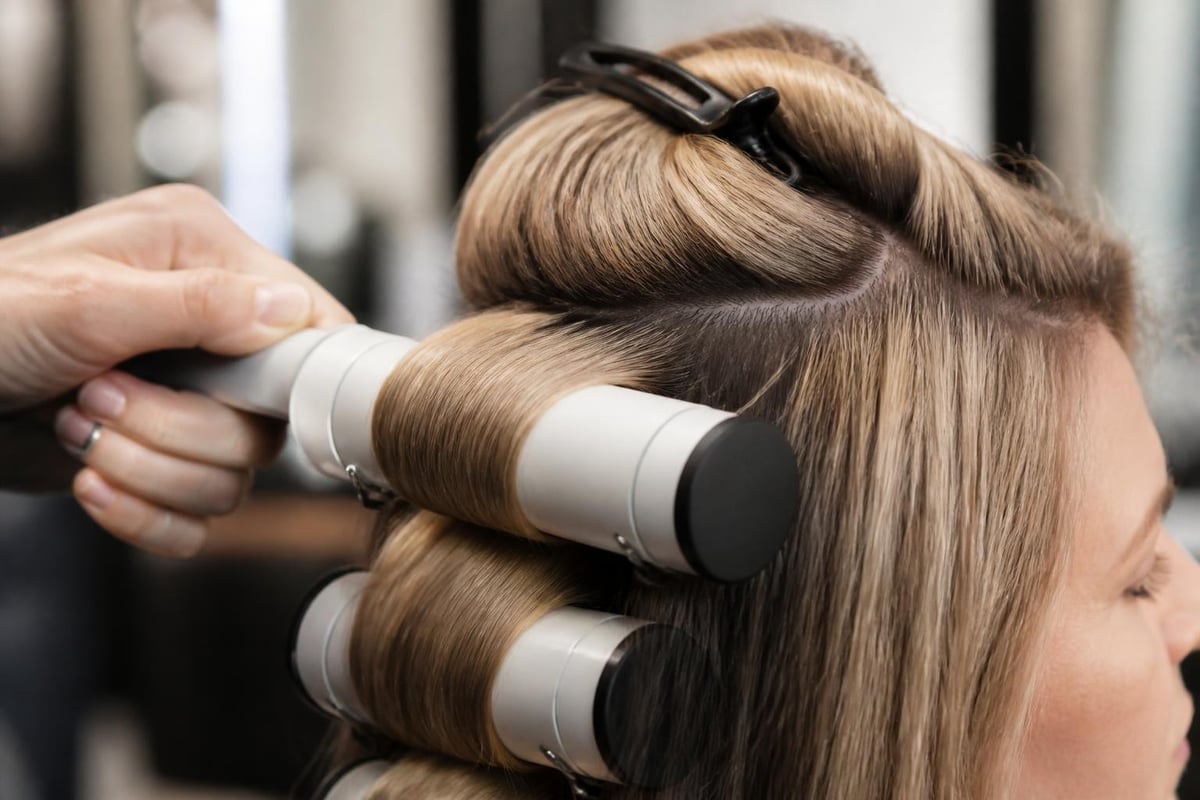
Phase Three: Rolling Technique for Maximum Volume
This is where proper technique separates a salon-quality result from a disappointing one. Take your first two-inch section at the nape, hold it straight out from the head at a ninety-degree angle, and place the heated roller at the ends of the hair.
Critical rolling mechanics:
- Position the roller underneath the hair ends with the barrel parallel to your scalp
- Roll the hair around the barrel with slight tension, moving from ends toward the root
- Keep the hair smooth and flat against the roller surface as you roll upward
- Roll in the direction you want the finished curl to move (back and away from face for most styles)
- Continue rolling until the barrel sits flush against the scalp
- The velvet surface should hold without clips, but secure with a pin if needed for heavy hair
Repeat this exact process for each two-inch section, working methodically from the nape upward through the crown and finally the sections framing your face. When you understand how to use ceramic thermal rollers with this directional rolling approach, you can customize the finished shape by changing the angle at which you hold each section before rolling.
Phase Four: The Cooling Period
This phase tests patience but determines whether your style lasts three hours or three days. Leave the rollers in place for a minimum of fifteen minutes, ideally twenty minutes for thick or coarse textures. The ceramic needs this full time period to cool completely while the hair sets in its new shape.
I had a medium-density client last month whose blowout held three full days after a single ceramic roller set because we let the rollers cool completely before removal. She came back the following week specifically asking to learn the technique herself because she'd never had volume survive past day one with any other method.
During this cooling time, do not touch, adjust, or remove any rollers early. Even small movements can disrupt the setting process and create uneven curl formation.
Phase Five: Removal and Styling
When the rollers feel completely cool to the touch, remove them in the reverse order you applied them, starting with the face-framing sections and working toward the nape. Gently unroll each barrel in the opposite direction you rolled it, supporting the curl as it releases.
Your hair will drop into structured curls or waves depending on your roller size and hair length. Do not brush or comb immediately. Instead, let the curls hang for two to three minutes while they adjust to gravity.
Then use a paddle brush or smooth polish brush with natural bristles to gently brush through the curls, combining them into soft waves with volume at the root. Brush in downward strokes following the curve of each curl to maintain the shape while blending the sections together.
For flyaways and baby hairs that appear during this brushing stage, the Hair Finishing Stick gives you precision control without the stiffness or residue of hairspray. This alcohol-free, water-based formula smooths those wispy pieces exactly where you need it, keeping the polished finish without weighing down the volume you just created.

Ceramic Thermal Rollers Versus Heatless Roller Clips: Performance Comparison
Many clients ask whether they should invest in heated ceramic rollers or stick with heatless alternatives like the volumizing roller clips I carry at The Pixie Garden. Both tools serve specific purposes, and understanding the difference helps you choose the right option for your styling goals and hair type.
| Feature | Heated Ceramic Rollers | Heatless Roller Clips |
|---|---|---|
| Hold Duration | 2-3 days with minimal touchup | 1-2 days, requires refreshing |
| Heat Exposure | Direct heat at 300-350°F | Zero heat exposure |
| Set Speed | 15-20 minute cooling time | 4-8 hours or overnight |
| Best Hair Type | Medium to thick, coarse textures | Fine to medium, heat-sensitive hair |
| Volume Level | High lift at root, structured shape | Moderate lift, softer wave pattern |
| Damage Risk | Low with proper technique and protectant | None, completely protective method |
The decision between these two methods often comes down to timing and hair health status. If you're working with compromised hair that's been chemically treated or shows signs of heat damage, the no-heat volumizing method gives you styling options without compounding existing damage. But when you need guaranteed hold for an event or you're dealing with resistant hair that doesn't respond to heatless methods, ceramic thermal rollers deliver the structural change necessary for lasting results.
Advanced Techniques: Customizing Your Ceramic Roller Set
Once you've mastered the basic application of how to use ceramic thermal rollers, you can modify the technique to create different finished looks by changing roller placement, section size, and rolling direction.
Targeted Volume for Specific Areas
Not every style requires full-head roller coverage. Strategic placement creates lift exactly where you want it while leaving other sections smooth or slightly textured.
Crown volume boost: Apply three to four rollers only at the crown and top sections, rolling straight back from the hairline. Leave the perimeter sections smooth or use a round brush while blow drying. This technique adds height without the full curled look.
Face-framing wave: Roll only the front two sections on each side of your part, directing them back and away from your face. The rest of your hair can be straight or gently waved with a flat iron for a mixed-texture style that looks current and editorial.
Section Size Modifications
The two-inch section guideline works for most hair types and desired outcomes, but adjusting section width changes the finished curl pattern and volume level. Narrower one-inch sections create more defined curls with tighter wave patterns, while three-inch sections produce subtle bends and soft volume with barely-there texture.
Thick hair benefits from smaller sections because the heat penetrates more completely when there's less hair wrapped around each roller. Fine hair actually performs better with slightly wider sections that don't over-curl or create too much texture for the hair's natural density.
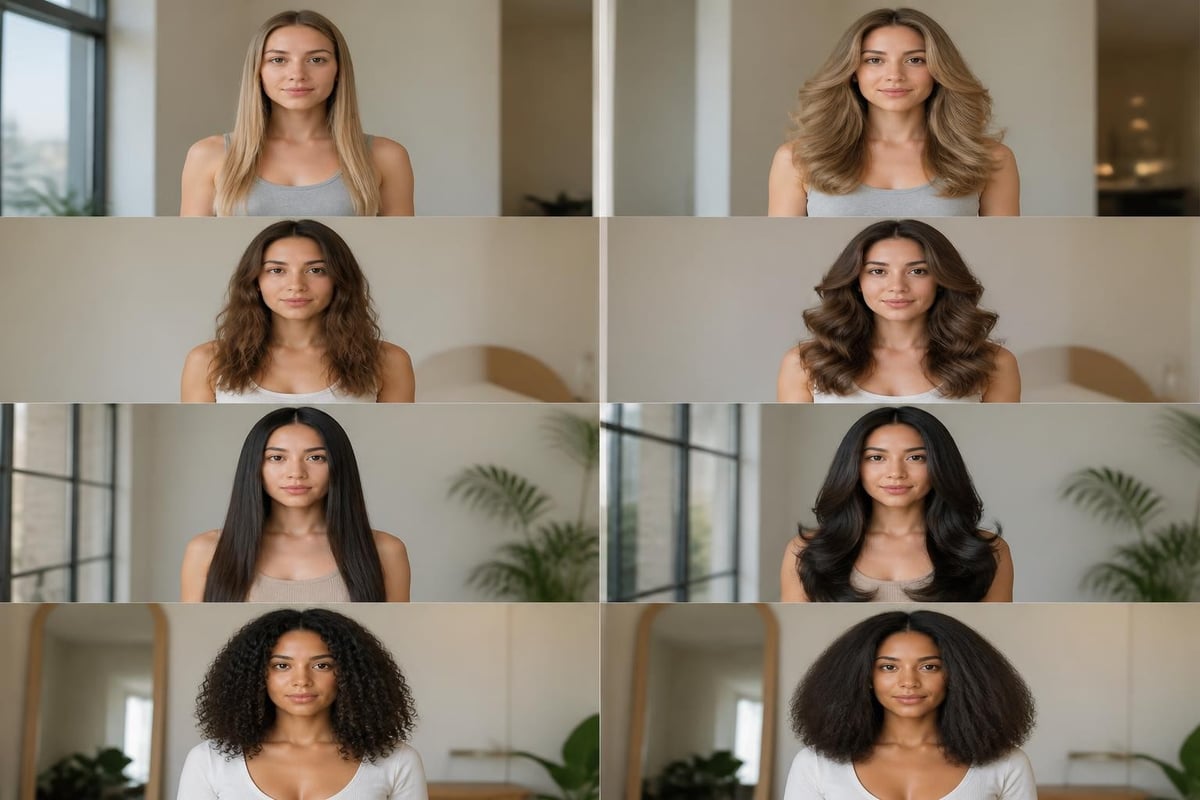
Ceramic Roller Styling for Different Hair Lengths and Textures
The ceramic thermal roller technique adapts to various hair characteristics with small modifications in application and cooling time. Understanding these adjustments prevents the frustration of following a technique that wasn't designed for your specific hair profile.
Short Hair (Chin Length or Shorter)
Short cuts require smaller barrel sizes than the XL rollers I typically recommend for longer hair. Look for medium-sized ceramic rollers that match your hair length, allowing you to roll from ends to root without creating excessive curl that turns into unwanted volume.
Roll short hair in the direction you want it to lay in the finished style. For pixie cuts with longer top sections, roll the crown area straight back for height, and direct the side sections slightly forward to create movement toward the face.
Medium-Length Hair (Shoulder to Collarbone)
This length range performs beautifully with ceramic thermal rollers because you have enough hair to wrap around the barrel multiple times, creating smooth curl formation without gaps or uneven texture. The XL barrel size works perfectly for medium-length hair, producing waves that start at ear level and create movement through the ends.
Focus your roller placement on the mid-shaft to ends rather than rolling all the way to the scalp if you want a more modern, less voluminous finish. This partial rolling technique gives you textured ends with smooth roots, which reads as current and polished rather than dated or overly styled.
Long Hair (Below Collarbone)
Long hair requires patience and more rollers to achieve even coverage, but the results justify the extra time investment. Plan for twelve to sixteen rollers minimum to section all your hair into two-inch panels from nape to crown.
The weight of long hair can pull out volume at the root if you don't secure each roller close enough to the scalp during the cooling period. Make sure every roller sits flush against your head, and consider using pin clips on the heaviest sections to prevent slippage while the ceramic cools.
Textured and Curly Hair
Naturally curly or coily hair types can use ceramic thermal rollers to stretch curl patterns, add uniform wave definition, or create elongated curls with more predictable shape than air-drying produces. The key difference in technique is the starting point. Your hair should be completely detangled and stretched (either blown out smooth or banded) before applying heated rollers.
This method works particularly well when you want defined curls without shrinkage, or when you're aiming for a specific curl size that's different from your natural pattern. The ceramic heat reshapes the existing curl into a new formation that maintains definition while giving you control over the finished diameter and direction.
Maintenance and Longevity: Making Your Ceramic Roller Set Last
The biggest advantage of learning how to use ceramic thermal rollers properly is the multi-day wear you get from a single application. With the right maintenance approach, you can extend your style from the initial set day through two additional days without heat reapplication.
Day one styling: This is your maximum volume day. The curls will be most defined and the root lift will be highest. Sleep on a silk or satin pillowcase to reduce friction that can create frizz or flatten one side of your style.
Day two refresh: You'll notice the curls have relaxed into softer waves with slightly less volume. This is actually the most versatile stage for most people. Refresh the crown area by using volumizing roller clips on dry hair for twenty minutes while you do your makeup. The targeted lift brings back height without requiring a full restyle.
Day three texture: By the third day, you're working with textured, lived-in waves rather than structured curls. Embrace this stage by pulling the top section into a half-up style secured with a claw clip, or adding texture spray and wearing it fully down with piece-y, separated waves.
Between uses, your ceramic rollers need minimal maintenance but consistent care for longevity. Let them cool completely before storing, wipe the barrels with a soft cloth to remove any product buildup, and store them in their heating base or a clean, dry container to prevent dust accumulation on the velvet flocking.
Common Mistakes When Learning How to Use Ceramic Thermal Rollers
Even with detailed instructions, certain errors appear repeatedly when people first start working with ceramic thermal rollers. Recognizing these mistakes helps you avoid them and achieve better results from your earliest attempts.
Rolling wet or damp hair: This is the most common error I see. Hair needs to be nearly dry before you apply heated ceramic rollers. Wet hair will steam against the hot ceramic, causing frizz, uneven texture, and potentially damage to the hair cuticle. The moisture also prevents proper curl formation because the hydrogen bonds can't reset while water is still present.
Removing rollers too early: Impatience destroys results. When you remove ceramic rollers before they've cooled completely, the hair hasn't finished setting in its new shape. The curls will drop within hours rather than days, and you won't get the volume retention that makes this technique worthwhile. Set a timer for the full twenty minutes and resist the urge to check your progress early.
Inconsistent section sizes: Taking random sections of varying widths creates an uneven finished look with some areas showing tight curls, others showing loose waves, and still others showing minimal texture. Use your roller barrel as a measuring guide, ensuring each section matches its width for uniform curl formation across your entire head.
Rolling in conflicting directions: Each roller should follow a logical directional pattern based on how you want the finished style to flow. Rolling some sections forward and others backward without intention creates chaotic texture rather than polished movement. Decide on your directional plan before you begin, typically rolling everything back and away from the face for classic volume.
Skipping heat protectant: The ceramic may distribute heat evenly, but it still reaches temperatures high enough to compromise hair health without protection. Always apply a heat protectant product before using ceramic thermal rollers, focusing on the mid-shaft to ends where hair is oldest and most vulnerable to heat damage.
Frequently Asked Questions About Ceramic Thermal Rollers
How long should I leave ceramic thermal rollers in my hair?
Leave ceramic thermal rollers in place for a minimum of fifteen minutes, ideally twenty minutes for medium to thick hair textures. The rollers must cool completely to room temperature while your hair is wrapped around them. This cooling period allows the hair's hydrogen bonds to reset in their new curved shape, which is what creates lasting hold. Removing rollers while they're still warm means your hair hasn't finished setting, and the style will drop within hours rather than lasting multiple days. Fine hair may set in fifteen minutes, while thick or coarse textures benefit from the full twenty-minute cooling time.
Will ceramic thermal rollers damage my hair with regular use?
Ceramic thermal rollers cause significantly less damage than flat irons or curling wands when used correctly with proper heat protection, because the heat exposure is indirect and distributed evenly rather than concentrated at a single point. The research on ceramic thermal properties shows that ceramic materials release heat gradually rather than creating temperature spikes that damage hair protein structures. However, any heat styling carries some risk, so limit ceramic roller use to two or three times per week maximum, always apply heat protectant spray, and maintain healthy hair with regular conditioning treatments. If your hair is already compromised from chemical treatments or previous heat damage, consider alternating between ceramic thermal rollers and completely heatless styling methods to give your hair recovery time between heat applications.
Can I use ceramic thermal rollers on fine or thin hair?
Fine and thin hair types absolutely can use ceramic thermal rollers, but technique modifications prevent over-styling that can make fine hair look too voluminous or dated. Use slightly larger barrel sizes than you think you need, which creates soft bends rather than tight curls that add excessive volume to already delicate hair. Roll only the mid-shaft to ends instead of all the way to the root, leaving the first two inches of hair at the scalp smooth to avoid the poufy, over-teased look that overwhelms fine features. Apply rollers to completely dry hair rather than the eighty-five percent dry guideline for thicker textures, because fine hair heats through faster and excess moisture creates frizz. The techniques for using ceramic hair rollers on fine hair emphasize gentle tension and shorter cooling times to prevent over-processing.
How many days will the volume from ceramic thermal rollers last?
When you apply ceramic thermal rollers correctly with proper cooling time and finishing techniques, expect your volume to last two to three full days with minimal maintenance between wear days. The longevity depends on several factors including your hair's natural texture (fine hair loses volume faster than coarse hair), environmental humidity (high humidity breaks down curl patterns more quickly), and how you sleep (silk pillowcases preserve styles better than cotton). My medium-density client whose style lasted three days represents ideal conditions: medium texture, low humidity climate, proper application technique, and silk pillowcase use. Most people experience peak volume on day one, slightly relaxed but still lifted volume on day two, and textured waves with moderate volume on day three before washing and restyling.
Mastering how to use ceramic thermal rollers transforms your at-home styling capabilities, giving you professional volume and long-lasting results without daily heat tool damage. The technique requires precision in sectioning, patience during the cooling period, and attention to rolling direction, but these skills develop quickly with practice. When you're ready to achieve polished, effortless hairstyles with tools designed by someone who understands professional styling, explore the curated collection at The Pixie Garden, where every product is selected to deliver salon-quality results with ease.